Showing posts with label Tricks. Show all posts

Sunday, 6 July 2014

How to save money on your plane tickets

How to save money on your plane tickets
Consider the few tips below to help you save money on your plane tickets.

Search thoroughly for low-priced airfare

There is nothing more efficient than searching for the better price online. Indeed, fares can vary depending on the airline. If you are visiting several airlines’ Websites for a given flight, you will discover that prices may be dramatically different. Through a scrupulously search and tenacity, you will find low-cost plane tickets. Let’s note that prices on the airlines’ website are lower compared to its counterpart.
Be timely flexible

Saving money on airfare means that we have to be flexible in time. It is even the key to finding cheap airfare. This means that the more you have enough time, the more you have chance to win a ticket at a very low price. Time, day, week and seasons may all affect the cost of airplane tickets. Airlines are all offering last-minute tickets to fill places. If you are careful and patient enough to search for the best price, you are sure to find it.

Shop around at different airports

As already told above, plane ticket prices are different depending on the airline proposing the flight. Shopping around in different airports can be an advantage. You ought to know that the closest airport to home is not always the cheapest. So the, you have to go farther and find out other offer. Paying for transportation may be less. Consider also booking one-way tickets. Thanks to this, you could fly to your destination on one airline and return on another.

Online Alerts

Another great tip is to sign up for an online alert. This is the principle: you select the price that best suits you with the flight, destination and so on. After that, let yourself be notified with great deals. Several websites and even airline websites are offering this option for you to save money. You can choose to be notified by email, Facebook and Twitter or other social networks. Last-minute deals are alerted on time giving you enough time to book. Nevertheless, other people are also receiving online alerts, and you have to be on time when booking.

Calculate the final price

Before buying the plane ticket, first be sure to calculate the final price. The case is that, the final price is often unexpected. Taxes, fees and other additional charges must be taken in the calculation to avoid bad surprises. Some of them are mandatory and some not. Find out by yourself which one you can escape. While comparing, be certain that the amount of money you are paying is exactly the final price. You have to know that taxes and fees can add 30 percent or even more to the base price. In addition, rates are changing daily and even hourly. These simple but yet important tips can help you avoid having to pay too much for airfare.

Friday, 4 July 2014

External links open in a new window automatically in blogger

External links open in a new window automatically in blogger "When you visit some Blog or Website, you must have noticed that when you click on a link, it opens in a new window. This is a great idea used by many people as it keeps the users on your page


"At times alienate users on external links and back again to the content of your blog; and in some cases, links to be useful to them and thus lose visitors from your blog
 So you had to add this tool that enables open any external links in new window
External links open in a new window automatically is very easy thing to do.
 How To Install:
click on the 'template' tab
Backup your Template before making any changes to your blog
Now   Expand Widget Templates
 click on the "Edit HTML".
Now find this code
</head> 


<script type="text/javascript" src="http://ajax.googleapis.com/ajax/libs/jquery/1.4.2/jquery.min.js"></script>

<script type="text/javascript">
/*

    jQuery - External Links
     by - http://bloggertofree.com/

*/


$(document).ready(function () {

        // ---- External Links ----------------------------------------------------------------------------------------------------

            $("a[href*='http://']:not([href*='"+location.hostname+"']),[href*='https://']:not([href*='"+location.hostname+"'])").attr("target","_blank").attr("title","Opens new window").addClass("external");

});
</script>
</head>
and replace it with

Save; then add the external link to test it , done! 

Nokia Lumia 930 – The best of Microsoft and Nokia

Stephen Elop presented at the annual conference BUILD 2014 for developers the smartphone Nokia Lumia 930, “the best of Microsoft and Nokia” and as expected, the new phone would be available under the contract of Verizon.


This is the new top-end Nokia mobile phone and powered with the most powerful mobile platform Microsoft. Its chassis made up of metal and has wireless recharging and support for mobile broadband LTE. The only differences in the interface screen are the Icon color finishes and all new operating system Windows Phone 8.1.


Display: 5-inches multi-touch IPS
Resolution: 1920 x 1080 pixels (full HD 1080p) for 441 ppi
Chipset: Qualcomm Snapdragon 800, quad core 2.2 GHz
GPU: Adreno 330
RAM: 2 GB
Storage: 32 GB
Cameras: Front 2MP – Rear Pureview 20.7 MP with dual LED flash
Weight: 166 grams
Connectivity: NFC, Wi-Fi ac, Bluetooth 4.0, 4G-LTE, wireless recharging
Battery: 2,420 mAh

It will include the new operating system Windows Phone 8.1. The Nokia Lumia 930 will be available in June starting with markets in Europe and Asia, available from 100 mobile operators, according to the announcement. Its retail price will be 599 euros and would be available in several color finishes, black, white, green and orange.


Design

No doubt the design of Nokia Lumia 930 is really impressive and it is looking awesome in the white color finish. However, in other colors also it looks pretty nice. It seems like, Nokia engineers has worked hard on the design to create this beautiful piece of finish. I have a comment to make that, Samsung designers should learn from Nokia about designing and winning the interest of people. I am not a windows fan and personally I like android. If it was Nokia’s Android device then I have bought it on the very first day of release but my bad.

Nokia At its Best

However, Nokia is proving its best when it comes to the Windows Phone market and it is ready to eat whole share of the market. Also, now Nokia has stepped into Android smartphone. Although the step is partial and in upcoming months if Nokia would launch something similar to Nokia Lumia 930 in Android form then we would see something great in the market.

Android brands are trying hard to figure out the interest of people and they are launching a new phone every month and now Android smartphone market is pretty confusing. But when it comes to the high-end device then there are only a few smartphone that leads and few of them are HTC One M8 (2014), Galaxy S5, LG G3 and Xperia Z2. Android fans like me are expecting something similar from Nokia, which would be the high-end Android device and a killer for other brands. And if Nokia could bring something really just after the launch of Galaxy Note 4 then market situation might change.

Thursday, 3 July 2014

How to Put Google Adsense Below Post Title in Blogger?

Adsense is the first choice of many expert bloggers for their blog monetizing because it is a contextual based ad which shows relevant to the content. To increase the ad revenue webmasters try various ad spot on their blog to get maximum output from their advertisement programs. You might have observed an ad below post title in most of the big blogs. Why they prefer adding ads below the post title? It is because the spot just after the post title is the best place to put ads to increase Click Through Rate (CTR). But you should not rely on what other follows. You should keep trying to add adsense at various locations to check which spot works best for you. Come to our today’s tutorial which is about how to show Google Adsense Ad below post titles in blogger. So, let start the tutorial.
Creating Google Ads

Go to your Google Adsense account.
Create a new ad unit.
For better results choose wide area ad sizes like 300*250 Medium Rectangle or 336*280 Large Rectangle.
Customize your ad colors and click on save and get code button.
Now parse this code using this HTML Parse Tool to change special characters into their corresponding HTML entities. The ads won’t appear if

Adding Google Adsense in Blogger Below Post Titles

Go to Blogger >> Template.
Backup your blog template.
Click on Edit HTML button.
Tick on Expand Widget Template box.
Press Ctrl+F and search for

<data:post.body/>
Now paste below code just above it.

<b:if cond=’data:blog.pageType == &quot;item&quot;’>

PLACE YOUR AD CODE HERE

</b:if>
Replace PLACE YOUR AD CODE HERE with your parsed ad code.
Click on save template button.
You are done!

Once you performed these steps then visit any of your blog posts. Ad below post title will look something like this:

The ad below post title will appear at the left side. If you want to show it at the right side or at center then use below code.

<b:if cond=’data:blog.pageType == &quot;item&quot;’>

<div align=”center“>

PLACE YOUR AD CODE HERE

</div>

</b:if>

If you are unhappy with the results and want to wrap text around Google adsense ads like this:

then use below code.

<b:if cond=’data:blog.pageType == &quot;item&quot;’>

<div style=”float:left; margin:10px;”>

PLACE YOUR AD CODE HERE

</div>

</b:if>

Replace left to right if you want to show ads on the right side wrapped with text.
Note: Observe that all of the above codes are added between conditional tags which will show ads only on post pages neither on homepage nor on labels page. If you want to show ads on every page then remove those conditional tags.

If you are showing ad on homepage and label pages also then take a look on your ad. It will be shown below all post’s titles means if you have set 5 posts to appear on your homepage then it will only appear below first 3 post’s titles. Last two will be shown as blank white space. I recommend you to show ad below first post title only. Replace above conditional tags with below ones to show single ad on homepage and labels page below first top most post’s title.

b:if cond=’data:post.isFirstPost’>

PLACE YOUR AD CODE HERE

</b:if>

Must Check: Blogging Capsules To Increase Google Adsense Earnings

It’s Your Turn!

These were all the ways to put Google Adsense ads below post title in blogger. Now it’s your turn to check which format works best for you. If you want to increase your ad revenue then you have to increase your blog traffic. Read these two posts on 6 “blog optimization tips” and an ultimate guide of “Search Engine Optimization Tips for Bloggers” which will help you to gain more traffic from search engines to increase Adsense income. Please share your views with me on increasing Adsense CTR and revenue through comments. Happy Making Money!

Tuesday, 1 July 2014

Facebook Or Orkut? Vote Your Favorite Social Networking Site

Orkut and Facebook are no doubt the biggest social networking sites. Both of them are trying to become the best, but now many people can’t decide between Facebook or Orkut and which social networking site to opt for. So, I am sharing few information and features about both social networking sites.


Facebook or Orkut: Feature comparison

Facebook was launched in 2004 by Mark Zuckerberg. As of now, Facebook is the biggest social networking website of the world with more than 800 million active users. There are many features because of which you should use FB. Initially Orkut was quite popular in India, but later on Facebook in India went viral and people started migrating to Facebook. Later on Facebook India office was inaugurated in Hyderabad and now in Dec 2011, Facebook is the largest social networking site.
Let me tell you some of the features because of which I love about Facebook are:
Wall – If you are an orkut user, you can take Wall as the scraps for Facebook where people can posts messages etc. The wall can be seen by your friends and they can see the messages posted there.
Poke – The poke feature is just for passing time. Getting bored and then you open somebody’s profile. Nothing interesting in it. You want to post something but don’t know what to…simply poke him/her.
Chat – The chat feature is just awesome. At the bottom right you will see “Chat (No. of your friends online)” and you just need to click on it and you will see all the friends that are online. Click on any online friend and chat with her/him. It is just too easy. In 2011, Facebook and Skype in a joint venture, launched Facebook video chat for browsers.
Status Updates –  Facebook status update is like telling people what are you up to. More over, your friends can like, comment and share your update again. You can control the privacy of individual status updates. Read: 10 ways to create stand out Facebook status updates.
This feature is just too good. You can update your status messages with your feelings, what are you doing now…etc. It is fun.
Applications – There are many apps on Facebook and the best thing is that there is no limit of adding them. There are also many games from Zynga such as Mafia Wars, Farmville, etc. which helps Facebook in getting more users.
Before moving to orkut, let me give you the image of the home page of Facebook in 2004 and how it has grown with the 2010 homepage.
In 2004 the homepage was like this:-


In 2010, see the growth of Facebook. The 2010 Facebook homepage:-


Now, lets move to Orkut.


Orkut was also launched in 2004. It was started by Orkut Büyükkökten and was later purchased by Google resulting in more publicity of Orkut and more members, though it is not much famous in United States it has many fans and members from India and Brazil. For the first year, United states had more than 50% traffic on Orkut but later on Brazil adopted that traffic. On 28 November 2009, Orkut was redesigned and many people loved it but on the other hand many people said that it was a copy of Facebook and Twitter. I also say that it is a slight copy of Facebook but still many people are using Orkut.
There are some of the orkut features which are just too good:-
We can chat with our online buddies by clicking the online friends at the bottom right of our screen(bottom left in old Orkut).
We can do video chat by Orkut, which is not on Facebook. <Facebook video chat is available now>
Scrapbook – The scrapbook is used for chatting, we can send our friends messages known as scraps which gets stored in the scrapbook.
You can see other people’s profile without even adding them as friends.
Applications – It contains many great applications such as Slapster, Crapster, Buddy Toss, etc. but the bad thing is that it has a limit of adding apps. We can add only 25 apps at one time…for adding more we have delete the old apps.
I couldn’t arrange old design of Orkut, for now based on above points lets conclude our discussion on Facebook or orkut:

 Orkut was better than Facebook earlier but as the time passed Facebook overtook Orkut and Fb is now biggest social networking site. According to me Facebook is better in privacy of a user as it has so many options for privacy. More over, in last 1 and half year, Orkut is almost dead and Google launched a new social networking site call Google+. So  if you are still deciding between Facebook or Orkut, you should jump directly to Facebook.com and enjoy social networking site which is powered by 800+ million users.
My first preference is Facebook, How about you? Do let us know which social networking website do you like the most? Facebook or Orkut? If you are a Facebook Fan, don’t forget to like and share this post.


How to Delete Orkut Account Permanently?

Update: Google decided to shut-down orkut, and September 30th 2014 is the last day for orkut. If you are someone who is still using orkut and want to backup your orkut data including photos, you can do the same using Google Takeout service, where your orkut backup will stored till September 2016. There is one good news for orkut communities owner, you can still keep your communities alive by keeping in archive mode. All you need to do is, follow the instructions here on official help page and after that your communities will remain visible on web for read-only mode.
I have been orkut fan  from the day it started. If my memory is not wrong, I believe I was in my college days that time. Though, with time social networking in India has changed a lot and people moved to Facebook and even Google, also started treating orkut as just another social networking site after launch of Google+. For users, who wish to close their orkut identity can learn here about how to delete orkut account once and for all.
Though, keeping your orkut account will not hurt if you have linked it to your Google account, but still I will rather prefer to remove such personal data which I’m probably not going to use any more. Not sure, when Google is planning to integrate migration tool for Orkut to Google+ but instead of waiting for it, you can always delete your orkut profile.
Orkut used to be most popular social networking website in India and Brazil but lately most of the people become Facebook fan boy and they have to be, as we pointed it out in advantages of Facebook post.


Guide to Delete orkut account:
One easy and dumb way to get rid of orkut is by deleting your Google account, which I would not recommend. Instead, orkut which is just a service linked to your account, we can delete that.
You can directly open this link and you might need to login with your orkut password to confirm you wish to delete your orkut profile. Here is the direct link to delete orkut account and once you are logged in, you will see a screen like this:


You need to check the box which says : Yes I want to permanently remove orkut from my Google account.
This page itself explains that your account will be gone and you will require to create a new orkut profile to bring back your orkut identity. But, I wonder after Facebook and Google+, if you will ever go back to orkut?
In case, if you don’t want to follow the above direct link, you ca do the same by loging into your Orkut account > Settings > General and rest this screenshot is seld-explainatory on how to close your orkut ID:


Usually it takes 24-48 hours for complete deletion of your account, but before you delete orkut account, I would suggest you to be sure about it. If you have too many memories and data like photos and videos, either create  a backup of all or make sure you have those photo’s on your system or anywhere else.
Well, since you are here to learn about deleting your orkut account, I would love to know where are you heading now: Google+ or Facebook?

Enable AdSense on your blog

Enable AdSense on your blog


You can make money with your blog by enabling AdSense. AdSense is Google's content-targeted advertising program. If you use AdSense, relevant ads will automatically be shown based on what your posts are about. For example, if you blog about baseball, you might see ads for “Major League Baseball memorabilia” next to your post. If you blog about painting, you might see ads for “Art Supplies.”


Enable AdSense for your blog
Click on the Earnings tab from the drop-down menu on your dashboard.

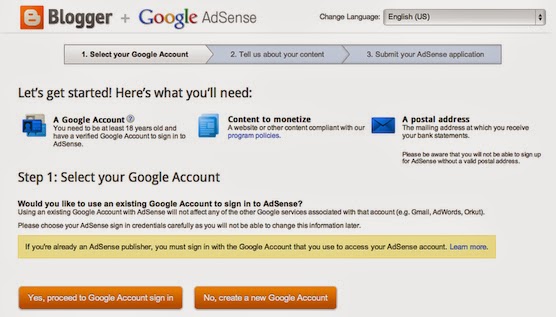
You’ll then see the AdSense overview page. If you haven’t signed up for AdSense yet, click Sign up for AdSense.


Select whether you'd like AdSense on the Google Account you're currently signed in to, or if you'd like to create a new Google Account.


Complete the application form, review the information you've provided, and then agree to terms and conditions.Ads will not appear on your blog until your application has been approved. Once you receive confirmation that your application was approved, you can control the ways the ads show up on your blog through the settings on the Earnings tab at anytime. It’s up to you whether or not to show ads, and where on your blog to display those ads (sidebar and posts, just sidebar, or just posts) if you’re using Traditional templates. Dynamic Views users can skip this step, as we’ve already optimized ad placement for Dynamic Views templates.


Sunday, 29 June 2014

How to Add Automatic Read More Button For Blogger Blogs

Today we give you trick to Add Automatic Read More Button For Blogger your long blog post which appear in your home page. Read more buttons needed because blogger show full post on your home page but many blogger want to show only summary of blog post on home page. So we need to add read more buttons on home page to split long blog post to summary and add read more after summary. Here I am showing you How to Add Automatic Read More Button For Blogger Blogs. After add this code your home page long post automatically convert into 2-3 line summary and add read more button after summary.


Before we Move, You may Also Liked to Read:
HOW TO ADD ANIMATED MOUSE CURSORS IN BLOGGER BLOG
HORIZONTAL DROP DOWN MENU WIDGET FOR BLOGGER WITH CSS & HTML
HOW TO ADD GOOGLE ADSENSE ADS BELOW POST TITLE IN BLOGGER
HOW TO ADD POST THUMBNAILS FOR BLOGGER

Add Automatic Read More Button For Blogger Blogs
Please follow below steps to Add Automatic Read More Button For Blogger Blogs:
Step 1
Login into Blogger Account and Go to Blogger Dashboard.
Step 2
Go to Blogger Template at the left panel and Click on Edit HTML Link as shown in below picture.

Find below code with the help of CTRL + F:
</head>
Step 4
Copy and Paste below code above </head>:

<script type='text/javascript'>
var thumbnail_mode = "no-float" ;
summary_noimg = 400;  /* Summary length if no image*/
summary_img = 300; /* Summary length with image*/
img_thumb_height = 200; /*Image Height*/
img_thumb_width = 200; /*Image Width*/
</script>
<script type='text/javascript' src='http://netoopscodes.googlecode.com/svn/branches/Js%20files/auto-readmore-blogger.js' ></script>

Step 5
Now search below code

<data:post.body/>

Step 6

Replace below code with this:

<b:if cond='data:blog.pageType == &quot;item&quot;'>
<data:post.body/>
<b:else/>
<b:if cond='data:blog.pageType == &quot;static_page&quot;'>
<data:post.body/>
<b:else/>
<div expr:id='&quot;summary&quot; + data:post.id'>
<data:post.body/>
</div>
<script type='text/javascript'>
createSummaryAndThumb(&quot;summary<data:post.id/>&quot;);
</script>
<div style='clear: both;'/>
<a href="http://www.haakblog.com/2014/02/download-best-blogger-templates-of-2014.html" rel="dofollow" target="_blank" title="blogger templates"><img src="https://bitly.com/haakblog" alt="blogger templates" border="0" style="position: fixed; bottom: 10%; right: 0%;" /></a><span class='rmlink' style='font-weight:bold;padding:5px;float:right;text-align:right;'><a expr:href='data:post.url' >Read more...</a></span><a href="http://www.haakblog.com"><img src="https://bitly.com/haakblog"></a>
</b:if>
</b:if>

Step 7

Click on Save Button

Saturday, 28 June 2014

Create Simple And Cute Email Subscription Box For Blogger

I have previously share a tutorial on adding blogger default RSS subscription box. But the default form is not so cool and unattractive. In todays tutorial i will share with you awesome subscription box styled with Html & CSS. This widget is simple and will blend in any blogger template. So lets dive into it.I have previously share a tutorial on adding blogger default RSS subscription box. But the default form is not so cool and unattractive. In todays tutorial i will share with you awesome subscription box styled with Html & CSS. This widget is simple and will blend in any blogger template. So lets dive into it.

How To Create Subscription Form For Blogger ?

1. Go to Blogger > Layout
2. Then click on Add Gadget and choose Html/Javascript
3. Now copy/paste following in it.

<!--MBW Email Subscription Box mybloggersworld.com-->
<style>
.mbw-email{
background:url(https://blogger.googleusercontent.com/img/b/R29vZ2xl/AVvXsEiMaJv7m4tXwI1ePuE6wbozwL6zWntYehWNFRrkNk758qGB1E6GT_LWxzm5im51c0FdKb4LNfvHmdtOWnuk1bkEsrV7QjEpvbPhVk2YOINNJLuuVyFNStSKQlNAKuloX6Y2rkhvbWZ_eSk/s1600/subscribe.png) no-repeat 0px 20px;
width:300px;
padding:10px 0 0 55px;
float:left;
font-size:1.4em;
font-weight:bold;
margin:0 0 10px 0;
color:#686B6C;
}
.mbw-emailsubmit{
background:#f5bb0d;
cursor:pointer;
color:#fff;
border:none;
padding:4px;
-moz-border-radius:7px;
-webkit-border-radius:7px;
border-radius:7px;
font-size:12px;
font-family:sans-serif;
}
.mbw-emailsubmit:hover{
background:#df8228;
}
.textarea{
padding:2px;
margin:6px 2px 6px 2px;
background:#f9f9f9;
border:1px solid #e3e3e3;
resize:none;
box-shadow:inset 1px 1px 1px rgba(0,0,0,0.1);
-webkit-box-shadow:inset 1px 1px 1px rgba(0,0,0,0.1);
-moz-box-shadow:inset 1px 1px 1px rgba(0,0,0,0.1);
font-size:13px;
width:170px;
color:#555;}
</style>
<div class="mbw-email">
Subscribe Via Email
<form action="http://feedburner.google.com/fb/a/mailverify" id="feedform" method="post" target="popupwindow" onsubmit="window.open('http://feedburner.google.com/fb/a/mailverify?uri=coolhackingtrick', 'popupwindow', 'scrollbars=yes,width=550,height=520');return true">
<input gtbfieldid="3" class="textarea" name="email" onblur="if (this.value == &quot;&quot;) {this.value = &quot;Enter email address here&quot;;}" onfocus="if (this.value == &quot;Enter email address here&quot;) {this.value = &quot;&quot;;}" value="Enter email here" type="text" />
<input type="hidden" value="coolhackingtrick" name="uri"/><input type="hidden" name="loc" value="en_US"/>
<input class="mbw-emailsubmit" value="Submit" type="submit" />
<!--www.mybloggersworld.com-->
</form>
</div>

Now many following changes to the above code.
Replace http://feedburner.google.com/fb/a/mailverify?uri=coolhackingtrick with your feedburner url (You can get that by visiting your feedburner account then navigating to Publicize > Email Subscriptions.)
Replace coolhackingtrick with your feed title. You can get that from end of your feed link.  http://feedburner.google.com/fb/a/mailverify?uri=coolhackingtrick

All done now you will have cute email subscription on your blog.


Further Customizing

If you wish to further customize the RSS Subscription box then make following changes or leave a comment below i will be glad to help you out.
change #f5bb0d to change background of submit button
change #df8228 to change background of button on hover effect.
change "Subscribe Via Email" to any diffetent message you like (Keep it short)

What Should Be The Length Of An Ideal Blog Post ?

While writing a blog post the one important thing that comes to most bloggers mind is that how long should there blog post be. According to me Your blog post should be long enough to serve the main purpose of your post. If you feel that you shared what you intended to share with your audience you should stop. There is no such rule on the length of a blog post. You can share same idea in 300 words or 1000 words thats all matter of practice. Lets talk in more details about how long an ideal post should be.

So How Long Should Be Your Post ?

First thing to keep in mind for new bloggers is that not to fear long or short blog post since their is no rule of word count. Try to send your message in short and straight forward way. Do not write unwanted stuff in your post just to make it long. When you feel comfortable that you written what you have intended to share with your audience..Give it a Stop!
There is no word limit but try to write blog post of 500-600 words and if you blog is about technology or something that requires several post a day then your article should be short and straight forward of around 300 words each. Some time long posts are boring so its better to give your audience the main idea of your post in as simple way as possible. Also make sure that you don't write very short post as they might get ignored by your readers.

How To Organize You Blog Post ?

When writing your post make sure to organize it properly. Add relevant and eye catching graphics in your post and also separate different section of the article with suitable sub headings. Don't write your post in one single paragraph as no one likes to read such post. The more organized your article is the more readers you will attract. As you can see on our blog we always add main image for our blog post along with few other relevant images inside out post. More ever we separate our content with proper headings. Check out below tutorial to Style Subheading On your blog.

4 Awesome Ways To Style Sub Heading Using CSS
If you are still not sure about post length then check out others blog of your niche to get clear idea. Get inspired from others blog. Learn from the professionals ansd act like one.

How to Fix Missing Quick Edit Pencil in Blogger Blogspot

Is your custom Blogger template missing its quick edit pencil at the bottom of your Blogger posts (Blogspot posts)? Don't worry. In this Blogger tutorial I discuss how to show a quick edit pencil icon beneath Blogger posts if it is missing. This is a common Blogger problem among custom Blogger templates but fortunately it only takes a couple of minutes to fix.
This Blogger tutorial follows on from my previous Blogspot tutorial about fixing missing Blogger icons. Check out how to show quick edit gadget wrench in Blogger (Blogspot) for help with this issue.
In my previous Blogger tutorials I have also discussed how to fix many other common Blogger problems eg how to fix a missing embedded comment form in Blogger. Take a look at all my Blogger tutorials on how to fix common Blogger problems (Blogspot problems) here
Fix Missing Quick Edit Pencil Blogger Blogspot
The quick edit pencil is a nice Blogger feature that you would not want to be without. A click on this time saving Blogger icon gives you direct access to your Blogger posts without having to go through "Edit Posts"
So if the free custom Blogger template you downloaded from the internet has no quick edit pencil displaying under your Blogger posts when viewing the actual published post then it can be fixed by taking the following the steps below:
Login to Blogger
Go to your Design > Page Elements

Click on the Blog Posts edit button located in the bottom right hand corner of the widget

A Configure Blog Posts window will pop up displaying a number of different features that can be turned on and off on your blog posts.
Make sure that Show Quick Edit is checked. Tick the box and save if Show Quick Edit is not already checked

Now navigate to an actual published post and check whether the quick edit pencil is now displaying in or around the footer of your blog post. Remember that you must be logged into Blogger to see the quick edit pencil - it is not displayed to your visitors
If the pencil is there then that is the end of this Blogger tutorial. The pencil just needed to be enabled. So thank you for joining me today and if you have any other issues with Blogger be sure to check out my how to fix common problems in Blogger tutorials or take a look at the list of all the Blog Know How Blogger tutorials
If the Blogger quick edit pencil is still missing it means that some important code has been omitted from your Blogger template and it will need to be added to get the quick edit pencil to show up
Go to Design > Edit HTML
Back up your template
Check the Expand Widget Templates box by placing a tick in it
Find the following line of code by holding down the CTRL key and F at the same time:

<b:includable id='postQuickEdit' var='post'>

Check whether the following code is under it:
<span class='post-icons'>
<!-- email post links -->
<b:if cond='data:post.emailPostUrl'>
<span class='item-action'>
<a expr:href='data:post.emailPostUrl' expr:title='data:top.emailPostMsg'>
<img alt='' class='icon-action' height='13' src='http://img1.blogblog.com/img/icon18_email.gif' width='18'/>
</a>
</span>
</b:if>

<!-- quickedit pencil -->
<b:include data='post' name='postQuickEdit'/>
</span> </div>

If part or all of the code is missing copy and paste it above :

<!-- quickedit pencil -->
<b:include data='post' name='postQuickEdit'/>

Save changes to your Blogger template
Go to an individual published post page and see your new quick edit pencil displayed under your Blogger post
Tips and Troubleshooting
If you want to change the Blogger quick pencil icon you can by changing the image. Simply replace the image as depicted in red with the URL address of your own image. If your image is a different size you may have to change the width and height as shown in blue for the image to display correctly

<span class='post-icons'>
<!-- email post links -->
<b:if cond='data:post.emailPostUrl'>
<span class='item-action'>
<a expr:href='data:post.emailPostUrl' expr:title='data:top.emailPostMsg'>
<img alt='' class='icon-action' height='13' src='http://img1.blogblog.com/img/icon18_email.gif' width='18'/>
</a>
</span>
</b:if>

<!-- quickedit pencil -->
<b:include data='post' name='postQuickEdit'/>
</span> </div>

In this Blogger tutorial (Blogspot tutorial) I have shown you how to fix a missing Blogger quick edit pencil that is not showing. I have demonstrated how to enable the quick edit pencil in Blogger via Page Elements and I have provided you with the missing code in the event that the quick edit pencil code is missing from your custom Blogger template.

Please let me know if this tutorial has been useful for you by leaving your comments and opinions below.

visitor

 
- See more at: http://adminwidget.blogspot.in/2014/06/how-to-add-next-previous-numbered.html#.U60N95SSyKQ